Showing posts with label Thanksgiving. Show all posts

Tuesday, May 28, 2019

The Best Roasted Butternut Squash EVER!


When I wrote that title I meant it! This is the best!!! Not only because it's delicious but it's also simple and easy to make and the ingredient list is super short. Don't let the chopping of a butternut squash deter you from making this recipe. Most grocery stores already have one chopped up for you! What I'm trying to say is- whatever you have to do to make this recipe just do it...
Watch the video above to see exactly how I chop up my squash and how much seasoning I use. Each squash is going to be a different size so the spice amount I list below are to be used as a guide. When seasoning your squash just make sure to get a nice, thin layer of seasoning onto all of your pieces and you will be good to go!

Roasted Butternut Squash
1 butternut squash (Around 2 lbs)
1 1/2 Tbsp extra virgin olive oil
1/2 tsp garlic powder
1/2 tsp chili powder
1/4 tsp salt
1/2 tsp pepper
non-stick cooking spray

Preheat oven to 415 degrees.
Spray a large cookie sheet with non-stick spray.
Peel the squash, cut off the ends, cut in half, and remove the seeds.
Then cut each half into half moon shapes. Cut each half moon into 3 strips and then curt each strip into cubes. (Watch the video above for clarification)
Arrange the cubes of squash onto a baking sheet in a single layer.
Drizzle on the olive oil then sprinkle on salt and pepper, and then the garlic powder and chili powder.
Toss with clean hands and arrange again in a single layer.
Put into a 415 degree oven for 15 minutes.
Take out and toss with a spatula and continue baking for an additional 15 minutes (30 minutes total).
Let cook slightly and then ENJOY!
 Nutritional Facts 
for 1 cup
103 Calories
13.5 Net Carbs
1.5 Grams of Protein


Sunday, October 28, 2018

low carb Chicken Cheesesteak Dip


By reading the title of this post you already know what the recipe is but what you might not know is... this is going to be your new go-to dip for pretty much everything in life. This dip is so easy with minimal ingredients that you cant help but make it for every occasion. Need an appetizer for game day? What about a Thanksgiving finger food? Gotta bring something to a party? Having people over for Halloween and need a fun snack? Craving a cheesesteak but don't want to make an actual cheesesteak? Low carbing and missing cheesesteak flavors? I could literally go on and on.... Whatever the occasion, hey, Tuesday night is also an occasion... you need to try this dip!

Recipe adapted from Chef In Trainings Cheesesteak Dip

My version is below:

low carb Chicken Cheesesteak Dip- Serves 6 people as an appetizer
3/4 cup chopped green bell pepper
3/4 cup chopped onion
1 1/2 cups cooked chicken, chopped small
1/2 cup mayonnaise
8 oz cream cheese at room temperature
4 oz provolone cheese, shredded or chopped small
2 Tbsp olive oil

Preheat your oven to 350 degrees.
In a 10 inch cast iron skillet (or oven safe skillet), heat olive oil over medium high heat.
Saute the onions and green bell pepper for 5-7 minutes until the onion are translucent and the peppers have started to brown on the edges.
Then add in the chicken and stir to combine.
Cube up the cream cheese block into about 8-10 pieces and drop that into the skillet. Let it sit for a few seconds to warm up and then stir in carefully.
Then add in the mayo, switch to a spatula and fold everything together.
Turn off the heat.
Then add in the provolone cheese, fold together again and then smooth into a single flat layer.
Pop into the oven for 20-25 minutes until it is golden brown and bubbly.

Be careful because the pan will be very hot.
Let sit for a few minutes before digging in!

Everyone will love this dip- serve these options for dipping!
-toasted baguette
-celery sticks
-bell pepper sticks
-cut a low carb wrap into "chip" shapes and toast at 350 degrees until crispy

ENJOY!

Nutritional Facts
Per Serving:
427 Calories
2 Grams Net Carbs
16 Grams Protein


Saturday, November 18, 2017

LOW CARB Thanksgiving Feast


Todays blog post is dedicated entirely to a low carb Thanksgiving Feast!  Watch the video above too! I hope this gives everyone some low carb holiday inspiration but more importantly I hope everyone has a joyous Thanksgiving. I know that I have tons to be grateful for! Thank you so much for reading and watching - XO- Kat Hart


LOW CARB THANKSGIVING FEAST
Links Below! Enjoy!!


Appetizers


Side Dishes 


Desserts


Tuesday, November 14, 2017

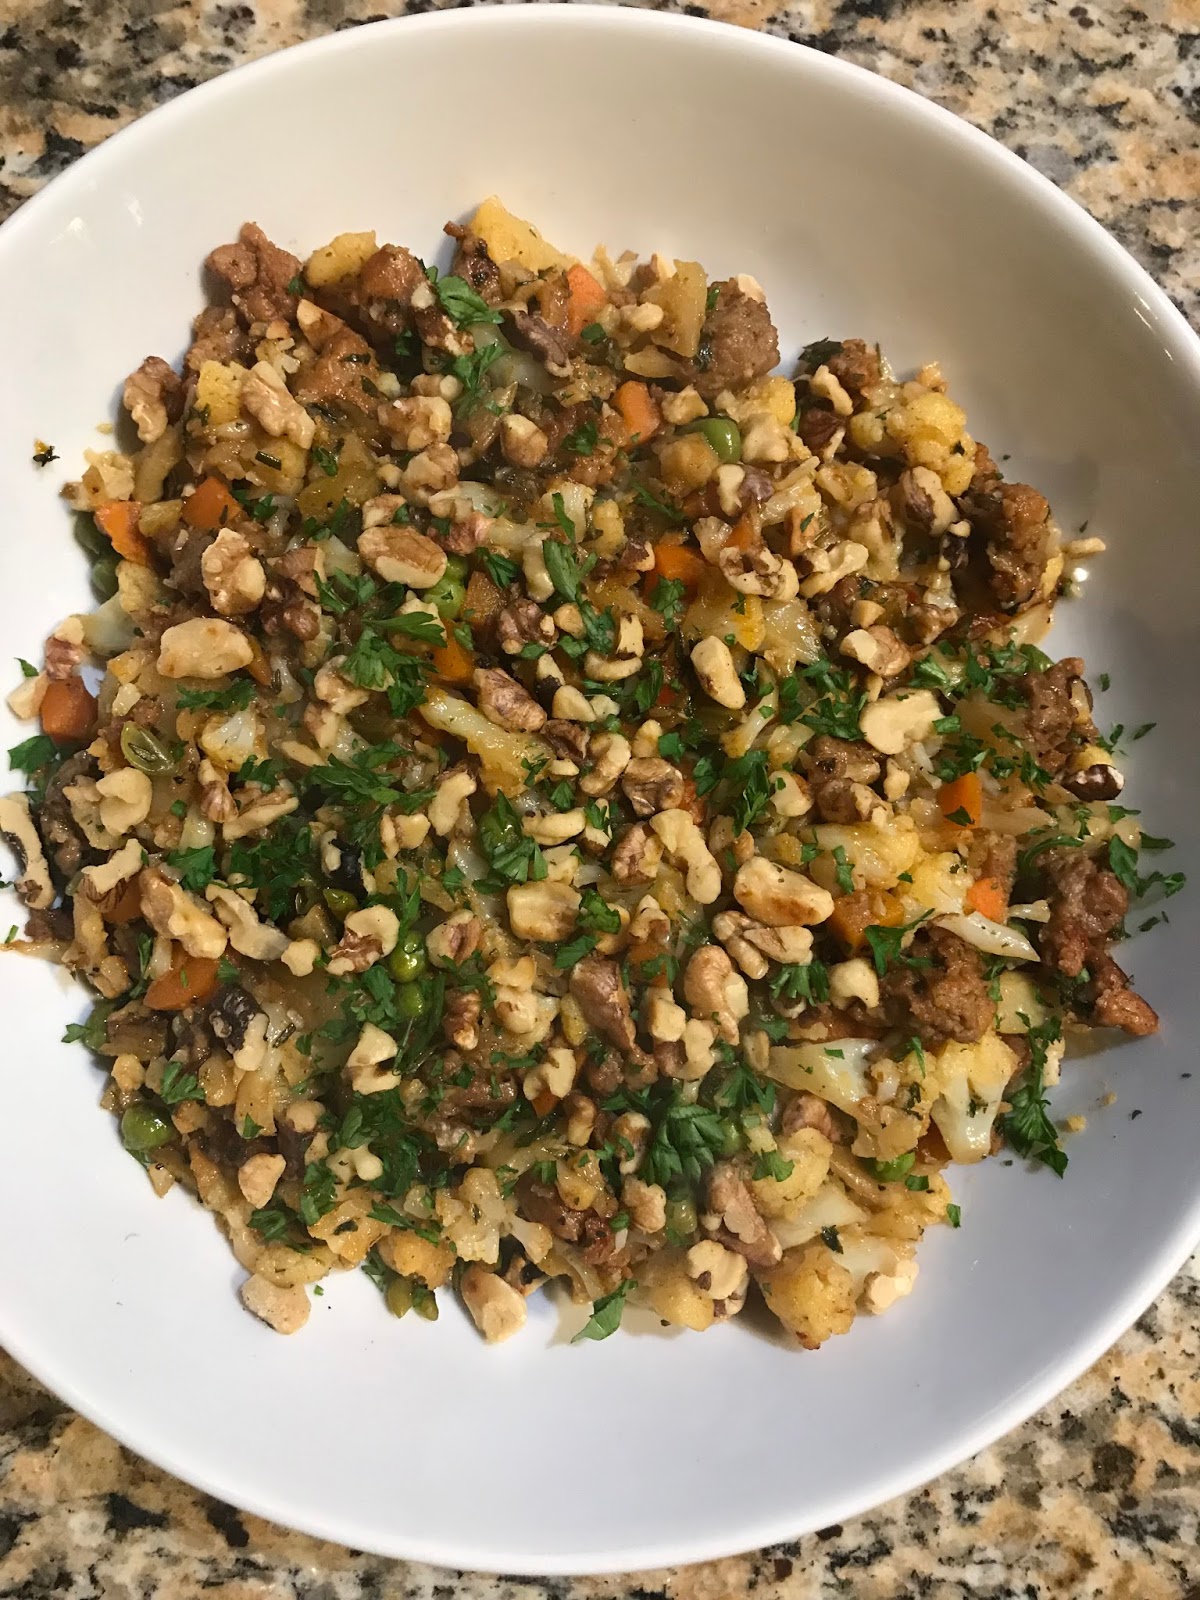
Low Carb Sausage & Cauliflower Stuffing


Just in time for Thanksgiving! Let me just say- I worked hard on this recipe because I wanted it to be perfect and I am beyond proud to say I think this is just about one of the best ever on my blog. Not only is it an amazing side dish BUT it can also be a great make ahead lunch or dinner for any time of the year. The ingredients are reminiscent of a comfort food classic that you can enjoy with your family and friends for the holidays or as a meal prep lunch at your desk. No matter how you decide to enjoy this one- make it. You will literally be in love... like I am right now... eating this as I am typing. *Bliss*

lil carb Sausage & Cauliflower Stuffing- Serves 8 as a side dish
3 Tbsp butter
1/2 cup onion, chopped
1/2 cup celery, chopped
2 cloves garlic, minced
5 cups cauliflower (about one medium head), chopped
2 Tbsp fresh parsley, chopped - Plus extra for garnishing
1/2 Tbsp fresh sage leaves, chopped
1 Tbsp fresh rosemary, chopped
1/2 lb ground Italian sausage, mild/sweet or hot (I used a combo of both!)
1 cup frozen peas and carrots
3/4 cup chicken or vegetable stock
1/2 cup chopped, toasted walnuts

In a skillet with high sides melt the butter over medium high heat.
Saute the onions and celery for 3 minutes.
Add in the ground sausage and cook for another 4 minutes breaking up the sausage as it cooks.
Next, add the chopped garlic and stir for 30 seconds until the garlic becomes fragrant.
Add in the cauliflower with a pinch of salt and pepper.
Turn the heat down to medium heat.
Cook, stirring occasionally for 8 minutes.
Then add in the rosemary, sage, and parsley along with the frozen peas and carrots.
Stir until mixed well.
Then, add the chicken stock to the pan and scrap the flavorful bits off the bottom of the pan.
Cover with a lid and allow to cook for 15 minutes or until all of your liquid has absorbed, stirring every couple minutes.
Then transfer to a serving bowl and top with toasted walnuts and some more chopped parsley.
Enjoy!


*Recipe makes 8 - 1/2 cup servings as a side dish for the holidays*
Per Serving:
154 calories
8.2 grams protein
5 grams net carbs


Tuesday, November 29, 2016

lil carb Italian Roasted Broccoli


Click the how-to video above! 

Per Serving:
263 Calories
7.5g Protein
6g Net Carbs

Broccoli roasted in the oven is such a great side dish. Broccoli is very economical right now aka cheap!  Which I am all about saving a buck- especially at this time of the year. Mama Bear needs to buy Christmas gifts! haha Oh and did I mention that my Italian roasted broccoli is low carb and delicious!? Make this side dish part of your dinner plate this week. It's already on my menu along side my lil carb Meatloaf!

lil carb Italian Roasted Broccoli- Serves 3
4 cups broccoli, cut into florets
1 1/2 cups sliced mushrooms
2 Tbsp extra virgin olive oil
1 tsp onion powder
1/4 tsp garlic powder
1/4 tsp crushed red pepper flake, optional
1 tsp Italian seasoning
1/2 tsp black pepper
3 Tbsp salted butter
1/4 cup whole milk mozzarella, shredded
2 Tbsp grated parmesan cheese

Preheat your oven to 425 degrees.
On a large sheet pan covered in tin foil and sprayed with cooking spray drop your broccoli.
Drizzle on the olive oil then sprinkle on all the garlic powder, onion powder, red pepper flake, Italian seasoning, and pepper.
Toss well to coat all the broccoli. Spread in a single layer and roast in the oven for 15 minutes (keep an eye to make sure your oven doesn't burn your broccoli).
Then remove pan from the oven and toss butter with the roasted broccoli.
Top the broccoli with the mozzarella and parmesan and bake an additional 5 minutes.
Remove from oven and serve up!  ENJOY!

Thursday, November 3, 2016

lil carb Green Bean Side Dish


Per Serving:
101 calories 
4.5 net carbs
3g protein 

With Thanksgiving and Christmas quickly approaching I am sharing as many recipes as I can to help you with low-carb-holiday-eating!  Let's face it, the holidays are centered around food and when you are on a specific diet- whatever it may be- it can easily put a damper on the holiday festivities. Look no further- I have everyone covered. Fill up your plate with some healthy proteins and lots of veggies and you will be good to go!  A staple on my dinner table and holiday table is my lil carb Green Bean side dish. It is SO good- words cannot even describe. The key ingredient here is some champagne vinegar. In your grocery store I bet you have seen flavored vinegars and maybe you have some at home and don't know what to do with them- well, use them with this recipe!  The vinegar I use in my recipe is a Pear Champagne Balsamic Vinegar and it is fantastic!  If you can't find a flavored vinegar just use plain champagne vinegar. Get excited! It is officially "holiday time"!!!

lil carb Green Bean Side Dish- Serves 6
1 lb green beans, ends cut off
8-10 garlic cloves, minced
1 Tbsp extra virgin olive oil
3 Tbsp butter
2 Tbsp champagne vinegar
Salt & Pepper to taste

To a large skillet add in the butter, oil, and garlic. Then turn on the skillet to medium heat.
This will perfume the oil and butter.
Once the garlic starts to bubble - about 1-2 minutes- add in the green beans.*
Sprinkle with pepper and salt, stir and cook for about 3 minutes.
The beans will be bright green and the garlic will be golden brown.
Then splash in the vinegar and stir.
Cook for 1 minute.
Then spoon the beans onto a platter and top with the pan sauce and garlic.
ENJOY!


*If you do not like crispy green beans then blanch the green beans in boiling water for 2 minutes and then put them in ice water. Then drain the water from them and proceed to the next step. Watch my above video for further explanation.

Thursday, October 27, 2016

lil carb Cauliflower Mac and Cheese


Per Serving:
280 calories
7g protein
3.5g net carbs

I have been making this side dish for years now... YEARS!  This cauli-mac -as I like to call it- is perfection.  It comes out magnificently every time- creamy cheese sauce and fresh cauliflower are a match made in food=heaven.  This side is perfect for a busy weeknight dinner but also a great make ahead for your Thanksgiving table!  Either way, you need this in your life- it's that good!

lil carb Cauliflower Mac and Cheese- Serves 6
1 medium size head cauliflower, cut into small bite size florets (about 4 cups)
1 cup heavy cream
3 Oz cream cheese
1 Tbsp mustard- use your favorite! (I use Whole Grain Dijon by Grey Poupon)
1 Tbsp mayonnaise
1 1/2 tsp garlic powder
3 Slices American Cheese, white or yellow
1/2 Cup Cheddar Cheese + more for topping
1/4 tsp salt (adjust to your taste)
1/4 tsp pepper

Preheat oven to 375 degrees.
Bring a pot of water to a boil on the stove and either boil the cauliflower for 4 minutes and drain well or steam cauliflower for 4 minutes and make sure to shake excess water off.
OR you can steam the cauliflower in the microwave in a bowl with 2 tablespoons of water for 2 minutes.
Then add to an 8X8 baking pan that been lightly sprayed with cooking spray.
In a saucepan heat heavy cream then stir in the cream cheese until melted.
Add in mayo, mustard, garlic powder and salt and pepper.
Whisk until combined then stir in the american cheese until melted. Then in 2 batches add in the 1/2 cup of cheddar and whisk until it melts. Cook for another minute until the mixture is thick and velvety. Pour cheese mixture over the top of the cauliflower in the baking dish. Mix the florets with the cheese to ensure even coverage. Top with additional cheddar cheese and put into the oven.  Cook for 30 minutes or until the sauce is bubbly and the cheese on top is melted and browned.  Remove from the oven and let sit for at least 5 minutes to cool and allow the sauce to thicken.
Then.... ENJOY!

Tuesday, October 25, 2016

lil carb Pumpkin-Shaped Cheese Ball


Everybody! Get excited!  This is my favorite time of the year! Back to back to back holidays!  Lets kick this season off strong with a fun video and a tasty snack!
This is the perfect Halloween or Thanksgiving appetizer for your family and friends!  Fun and festive and totally EASY! Bring this to a party this season and everyone will be asking you for the recipe and they'll be telling you how cute it is!
Check out the video above because I had a special guest come into the lil Piece of Hart kitchen and teach me how to make this... hehe! Hint: she may or may not have come all the way from Kansas!

lil carb Pumpkin-Shaped Cheese Ball
8 oz softened cream cheese
3/4 cup colby jack pre shredded cheese
3 Tbsp pesto, jarred or homemade (I used my homemade traditional basil pesto- click here for the recipe!)
2 Tbsp dried minced onion
1/2 tsp dried oregano
1/4 tsp crushed red pepper flakes (optional)
1 clove of garlic (optional)
1/4 tsp salt
1/4 tsp pepper
1 orange bell pepper
+extra veggies for serving- I like to use celery, baby carrots, red or green bell pepper and a leaf of iceberg to use in the center of the veggie platter underneath the pumpkin ball.

In a food processor add in the cream cheese, colby jack cheese, pesto, minced onion, oregano, salt pepper as well as red pepper and garlic clove if you are using them.
Pulse until well combined. If mixture balls up just break it up with a spatula and pulse again until everything is well combined.
Turn out the cheese mixture onto a large piece of plastic wrap.
Cover in plastic wrap and form mixture into a ball.
Place in the fridge for at least 2 hours to firm up and for the flavors to develop.
When you are ready to serve take 3/4 of your orange pepper and chop it into very small pieces (watch my video above for clarification) and reserve the stem of the pepper any extra large pieces of paper just put them on the veggie platter for dipping.
Roll the chilled cheese ball in the orange pepper pieces pushing the pieces into the cheese.
Put the cheese ball on a leaf of iceberg lettuce in the middle of a veggie platter or large plate. Surround with cut up veggies for dipping and take the orange pepper stem and press it into the top of the cheese ball to resemble the stem of a pumpkin.
Then dig in and Enjoy!

*Hint: Double this recipe to make a larger cheese ball OR make 2 cheese balls so when guests dig into the first one you can replace it with a new pumpkin!